Over the weekend I drove to Orange County with a friend of mine and went to a Patchwork Show -- the edible edition. The two day event was a gathering of chefs, bloggers, authors and, dare I say, foodies exploring for eating, learning, tasting and shopping.
On top of a big vendor fair filled with handcrafted wares and artisan foods, free food classes were offered to those in attendance. We attended a tamale making class, went to a DIY kimchee class and learned how to make goat cheese. While all of that was fun and games, there was one thing I walked away I was really excited about.
I signed up for a zero-obligation delivery of a box of fresh, organic produce. This is something that I have known friends to do, but had never found one in San Diego. Although I was in Orange County, the company offering the box happened to make deliveries in San Diego too. How perfect.
Today, at the very early hour of 3 a.m. I got my first delivery from Farm Fresh to You. Waking up to a box of goodies waiting on my doorstep felt like Christmas morning. What would be inside when I opened the package? It takes a certain type of someone to get so excited about produce. It also takes a certain type of lazy to get produce delivered. I happen to be both of those.
When I opened my regular mix (both fruit and vegi) box, touted as being for two to three people, I found:
2 Delicata Squash
1lb Russet Potato
4 Gala Apples
4 Green Bartlett Pears
1 Pomegranate
2 Eureka Lemons
1 bundle Baby Broccoli
1 bunch Carrots
1 bunch Dino Kale
1 bunch Romaine Lettuce
I think I was most excited about seeing the Delicata Squash, the first time I'd seen one since last winter. Immediately I decided I had to make a Steamed Broccoli and Delicata Squash with Tahini Sauce recipe that I'd made earlier in the year during a Martha Stewart Whole Living Magazine cleanse I participated in.
I thought about cooking all day during work and boy was the end result worth the wait. So delicious. The zero-obligation sell has me sold. I can't wait to get my next box of goodies. If you should be so inclined to try out this delivery service for yourself, you go online to www.farmfreshtoyou.com and if you enter promo code 6164 as well as my first and last name you will get $10 off your first box, not to mention that I get a little discount off my next delievery.
This blog combines two of my favorite things... food and TV. Here I will write about restaurants, recipes, tv, movies and whatever else might taste right at the moment.
Wednesday, October 9, 2013
Tuesday, January 22, 2013
It's my birthday, I'll eat bacon if I want to
For anyone who knows me, or for those of you I've never met but whom have read posts from this blog, you know that I have no shame in admitting how much I love bacon. I get bacon gifts from friends, e-mails about bacon from co-workers, even my parents like to tease me about my obsession with bacon. It's my love of bacon that stopped me dead in my tracks in the middle of a Sur la Table while Christmas shopping with my parents this year.
There it was in what seemed like big, bold letters: "Better with Bacon" on the store's cooking class schedule slated for none other than my birthday. It was at that moment that the heavens opened and the angels told me this was destiny. Ok, well maybe that was not exactly how it went, but it sure felt like it. I mean, come on: "Better with Bacon" on the day of my birth?! I immediately snapped a picture of the calendar and sent it out to my friends, saying "Too bad I have to work, this would be an awesome way to spend my birthday!"
Fast forward to the week before my birthday. I hadn't really thought about the cooking class much after that fateful holiday shopping day, when I get a text asking what time I had to work until on my birthday. "8p.m." I replied. To which the return text said, "Hmmm...looks like I'll be cooking bacon alone."
After much pleading with coworkers and my boss to help me get to cooking class, I finally found someone willing to change days off, giving me my whole birthday off of work. The persuasive powers of bacon worked as I promised to bring in something I learned how to cook in exchange.
Now that this is already a long blog post, I'll get to the goods: The actual "Better with Bacon" cooking class. I'm not actually going to post the recipes they gave us because I feel like that would be stealing from Sur la Table, but here's how the night went. And maybe if I cook the recipe at a later date I will post it.
There were about 13 people in our cooking class. We were split into small groups of 3-4 people and each group was given its own cooking station. Chef Justin was leading the class and made it abundantly clear that he LOVED bacon and, like me, made sure he got out of his other job so he could teach this class.
![]() |
| Chef Justin with his bacon jazz hands. |
![]() |
| Preparing dessert. Can't we just eat now?! |
![]() | |
| Baked beans simmering on the stove. |
Then came our green chile, apple and bacon chutney. This was by far the most fragrant thing we cooked in class. The mixture seemed a bit bizarre and probably wasn't the prettiest of the food we cooked, but if it was as good as it smelled, I was game to try it.
![]() |
| Chutney mise en place. |
Finally we did a little molecular gastronomy by using bacon fat and maltodextrin to create bacon powder. Yes, an actual bacon powder that we later sprinkled onto a starter salad.
After a break where we took a stroll through the store, drooling at all the wonderful kitchen gadgets we couldn't afford, we returned to class to put everything together for the main meal.
Here's where I got the biggest whammy of the class. In the only other cooking class I have taken (it was not at Sur la Table), we just got little bite-sized samples of what the teacher prepared in front of us while we all sat and took notes. In this class, however, we ate a full-on dinner. It started with the salad and bacon powder, which yes, the powder tasted like bacon, but at first had a bizarre texture that took me by surprise. The baked beans were our side dish; delightful, yes, but I couldn't get past the red beans, so this was probably my least favorite part of the meal. The main dish was a grilled pork chop (of course more pig) topped with our chutney. The flavors here were incredible. Just the right amount of sweet and spicy to go with the chop. Finally, and my favorite part of the meal, the pie. The dough had just the right amount of flakiness, the apples had the right amount of sweetness and when both were topped off with a hit of bacon it was the perfect dessert combination to end the night.
![]() |
| Pork chop with bacon, chile, apple chutney with baked beans in the background. I forgot to take a picture of the salad with the bacon powder. |
Mise en place: a French phrase which means "everything in place", as in set up. This is the act of pre-measuring or cutting ingredients before you start cooking, so that all you have to do is add them to a pot or pan.
PPS: This is my 100th post! It only took me five years to get here, but I'm happy to say this milestone occurred hit when the topic was bacon.
Tuesday, December 25, 2012
Nutella fudge
Where did the time go? It feels like just yesterday that I was making turkey place settings and cooking Thanksgiving dinner and all of a sudden, Christmas is already over with. Since I obviously lost track of time during the holiday season this year, I wasn't able to fit much baking into my schedule. I was, however, able to whip up a couple of new recipes that took practically no time at all.
For holiday gifts for coworkers, this year I made a candied pecan that was as simple as tossing the nuts in two different gallon-sized bags, once with an egg mixture and the other with a cinnamon and sugar concoction then baking for a an hour at a low heat. To accompany these small packages, I made cinnamon ornaments. The recipe suggested baking the ornaments, which I did, but I also let a handful air dry. If you have the time available to air dry, I thought they turned out much nicer. These simple ornaments made my apartment smell absolutely divine!
The pièce de résistance, though, was a salted, Nutella fudge. I made three batches of this simple-to-make candy and people loved it. I put some on trays throughout my office and packaged some up for small gifts (and maybe a few managed to make it into my belly before I could even get them out of the door). On the third batch I made, I was very tempted to warm about a 1/3 cup of peanut butter and swirl it into the fudge, but at the last second decided not to mess with what was already established as being delicious.
The recipe I found on Pinterest and it came from the Tasty Kitchen blog. Here is the recipe:
Chocolate Nutella & Sea Salt Fudge
Prep Time: 5 Minutes
Cook Time: 8 Minutes
Servings: Depending on how large you cut the pieces, 30-42
Difficulty: Easy
Ingredients
Grease the bottom and sides of an 8- by 8-inch baking pan with butter. Line the pan with parchment paper, leaving a 2-inch overlap on the sides.
In a medium glass or stainless steel bowl, stir together sweetened condensed milk, vanilla, bittersweet chocolate chips, Nutella, and butter.
Form a double-boiler by setting the bowl over a medium pot of gently simmering water. The water level should be low enough that the bottom of the bowl does not touch the water. Stir until the chocolate chips are melted and the mixture is smooth, 5 to 7 minutes.
Scrape the mixture into the prepared pan, spread the top smooth with a spatula, and sprinkle with sea salt. Refrigerate until the fudge is firm, at least 2 hours.
Once the fudge is chilled, run a knife under hot water, dry it off, and run it around the edges of the pan to loosen the fudge. Using the overhanging parchment paper, lift the fudge out. Peel off the parchment paper. Cut the fudge into 3/4-inch squares. Store in the refrigerator in an airtight container or wrapped well in plastic wrap and foil.
For holiday gifts for coworkers, this year I made a candied pecan that was as simple as tossing the nuts in two different gallon-sized bags, once with an egg mixture and the other with a cinnamon and sugar concoction then baking for a an hour at a low heat. To accompany these small packages, I made cinnamon ornaments. The recipe suggested baking the ornaments, which I did, but I also let a handful air dry. If you have the time available to air dry, I thought they turned out much nicer. These simple ornaments made my apartment smell absolutely divine!
The pièce de résistance, though, was a salted, Nutella fudge. I made three batches of this simple-to-make candy and people loved it. I put some on trays throughout my office and packaged some up for small gifts (and maybe a few managed to make it into my belly before I could even get them out of the door). On the third batch I made, I was very tempted to warm about a 1/3 cup of peanut butter and swirl it into the fudge, but at the last second decided not to mess with what was already established as being delicious.The recipe I found on Pinterest and it came from the Tasty Kitchen blog. Here is the recipe:
Chocolate Nutella & Sea Salt FudgePrep Time: 5 Minutes
Cook Time: 8 Minutes
Servings: Depending on how large you cut the pieces, 30-42
Difficulty: Easy
Ingredients
- 1 Tablespoon Butter, For Greasing Pan
- 1 can (14 Oz) Sweetened Condensed Milk
- 1 teaspoon Vanilla Extract
- 8 ounces, weight High-quality Bittersweet (60%) Chocolate Chips
- 1 cup Nutella (chocolate-hazelnut Spread), Room Temperature
- 3 Tablespoons Unsalted Butter, Room Temperature, Cut Into 1/2-inch Pieces
- ½ teaspoons (approximately) Sea Salt
Grease the bottom and sides of an 8- by 8-inch baking pan with butter. Line the pan with parchment paper, leaving a 2-inch overlap on the sides.
In a medium glass or stainless steel bowl, stir together sweetened condensed milk, vanilla, bittersweet chocolate chips, Nutella, and butter.
Form a double-boiler by setting the bowl over a medium pot of gently simmering water. The water level should be low enough that the bottom of the bowl does not touch the water. Stir until the chocolate chips are melted and the mixture is smooth, 5 to 7 minutes.
Scrape the mixture into the prepared pan, spread the top smooth with a spatula, and sprinkle with sea salt. Refrigerate until the fudge is firm, at least 2 hours.
Once the fudge is chilled, run a knife under hot water, dry it off, and run it around the edges of the pan to loosen the fudge. Using the overhanging parchment paper, lift the fudge out. Peel off the parchment paper. Cut the fudge into 3/4-inch squares. Store in the refrigerator in an airtight container or wrapped well in plastic wrap and foil.
Friday, November 23, 2012
Turkey gobble day
It is a rare occasion that I even get to have Thanksgiving off from work and even more rare to be able to take a week of vacation surrounding the holiday. I made it my goal during my vacation to spend some time cooking and crafting while relaxing.
As part of the relaxing phase of my vacation I was watching the Today show the other morning with my mom with Giada de Laurentiis had a segment about Thanksgiving cooking. While the lemon and thyme didn't appeal to me, the adorable Oreo turkeys she had caught my eye. And appropriate to my vacation goal it was both a food and craft project.
Once the peanut butter cups are in place, repeat with the malt balls and place them between the cups and the candy corn making the head of the turkey.
Finally, dip the white portions of the candy corns that were broken off into the chocolate and place it onto the malt ball as the beak of the turkey. Once you have assembled all of the turkeys, place in the refrigerator to set for about 10 minutes.
While the chocolate is setting, take time to color your frosting with food coloring. In the case of my turkeys I used Betty Crocker's Cake Icing which came with piping tips rather than having to put frosting into a plastic bag to pipe on to the malt ball as the turkey's beard.
Once this is finished, place the Oreo's with the attached candy onto the frosting up cookie to use as a base that will allow the turkey to stand up right.
Note; These are not the most sturdy of decorations, so try not to move them around too much after they are finished. To reinforce the base a little more, you could always try using a little of the extra chocolate on the base and refrigerating them again for a few minutes. These made lovely name cards by attaching a piece of paper with someone's name to a little toothpick and placing that into the creme of the base cookie.
As part of the relaxing phase of my vacation I was watching the Today show the other morning with my mom with Giada de Laurentiis had a segment about Thanksgiving cooking. While the lemon and thyme didn't appeal to me, the adorable Oreo turkeys she had caught my eye. And appropriate to my vacation goal it was both a food and craft project.
What you need to make six candy turkeys:
12 Oreos (I found that the Double Stuffed version worked the best)
Note: Six of the Oreos will need to have one side of the cookie removed
36 Candy corns
Note: The white tip will need to be taken off from 6 of the candy corns to be used as a beak
6 Malt balls
6 Reeses miniatures
3/4 Cup bittersweet chocolate chips
2-3 Tablespoons of red frosting
Carefully insert five candy corns, white tip down, around the top of each of the Oreos. It's best to hold steady the Oreo near the top while pressing the candy corns into the creme filling as to not separate the cookie.
Place the chocolate chips into a glass or stainless steel bowl. Place over a pot with a small amount of simmering water and stir occasionally until the chocolate is melted. Dip the large end of the peanut butter cup (I actually used Christmas chocolate bells) into the melted chocolate and place that end against the bottom of the cookie opposite of the candy corns. The chocolate will act as a glue.
Once the peanut butter cups are in place, repeat with the malt balls and place them between the cups and the candy corn making the head of the turkey.
Finally, dip the white portions of the candy corns that were broken off into the chocolate and place it onto the malt ball as the beak of the turkey. Once you have assembled all of the turkeys, place in the refrigerator to set for about 10 minutes.
While the chocolate is setting, take time to color your frosting with food coloring. In the case of my turkeys I used Betty Crocker's Cake Icing which came with piping tips rather than having to put frosting into a plastic bag to pipe on to the malt ball as the turkey's beard.
Once this is finished, place the Oreo's with the attached candy onto the frosting up cookie to use as a base that will allow the turkey to stand up right.
Note; These are not the most sturdy of decorations, so try not to move them around too much after they are finished. To reinforce the base a little more, you could always try using a little of the extra chocolate on the base and refrigerating them again for a few minutes. These made lovely name cards by attaching a piece of paper with someone's name to a little toothpick and placing that into the creme of the base cookie.
Tuesday, July 31, 2012
Del Mar Gourmet Food Truck Festival
![]() |
| The crowds start to gather outside the food trucks at the Del Mar Races. |
It's no secret that I enjoy a good meal from a gourmet food truck. I follow several on Twitter and Facebook and love trying new ones when I get the chance. So when I found out that there would be about 50 food trucks gathered at the Del Mar races this weekend, I obviously jumped at the opportunity.
Upon arrival at the festival, we were given a map of where each food truck was located, but that was pretty useless, since nothing was where the map said it was. Our plan of attack was to walk around and look at each of the menus then go back to the ones we thought looked good. After looking through the first 10-15 trucks we couldn't resist trying something.
![]() |
| First stop: The Green Truck and its Smoked Gouda grilled cheese with apple slices and prosciutto on a honey, fig bread. |
![]() |
| Bryan showing off his Loco Moco dog. |
![]() |
| Second stop: Lime Truck. Adobo taco on the bottom, Ultimate Taco on the top. |
Second stop: The Lime Truck, an Irvine truck that won a season of "The Great Food Truck Race" on the Food Network. The truck serves California cuisine with local, organic and sustainable food. Just as we were about to reach the window, a woman walked up to the truck with a certificate in hand announcing that the Lime Truck had been voted best fresh food truck at the festival. Looks like we picked a good one. Order: Ultimate Taco, Sweet and Spicy Taco, Adobo Taco and Roasted Corn (don't worry, it wasn't all for me). Clear winner to me was the Adobo Taco filled with pork belly, tomatillo pico de gallo, cilantro and sriracha. I probably could have eaten two or three more of these tacos, but the line was way too long to get back into.
After stuffing our bellys with food truck food we decided to head into the arena for some horse racing. Food must have been on my mind because it carried into my horse betting. Apparently putting my money on horses like Sweet Treat and Kettlecorn wasn't the best idea because I didn't win one race. I like hedging my bets with Food Trucks more than horses.
![]() |
| Workers inside the Waffles de Leige bake up tasty waffles. |
![]() |
| The piece de resistance: dessert. Yum! |
To top the night off I went to see "Moonrise Kingdom," the newest film from Wes Anderson. It was an all-star cast and an endearing story marked with Anderson's quirky touches. The actor and actress that played the main characters were both newbies to the big screen, but did an excellent job. I haven't seen a lot of Anderson's movies, but am glad to have seen this one.
Wednesday, July 11, 2012
Summertime Jello shots
My love for Pinterest continues when I found a pin for a new way to present Jello shots. If you ever went to a party in college, chances are you've had a Jello shot before. They're usually served in the bottom of a small dixie cup where you have to use your finger to pry it out, usually resulting in a colored finger and a mangled chunk of Jello.
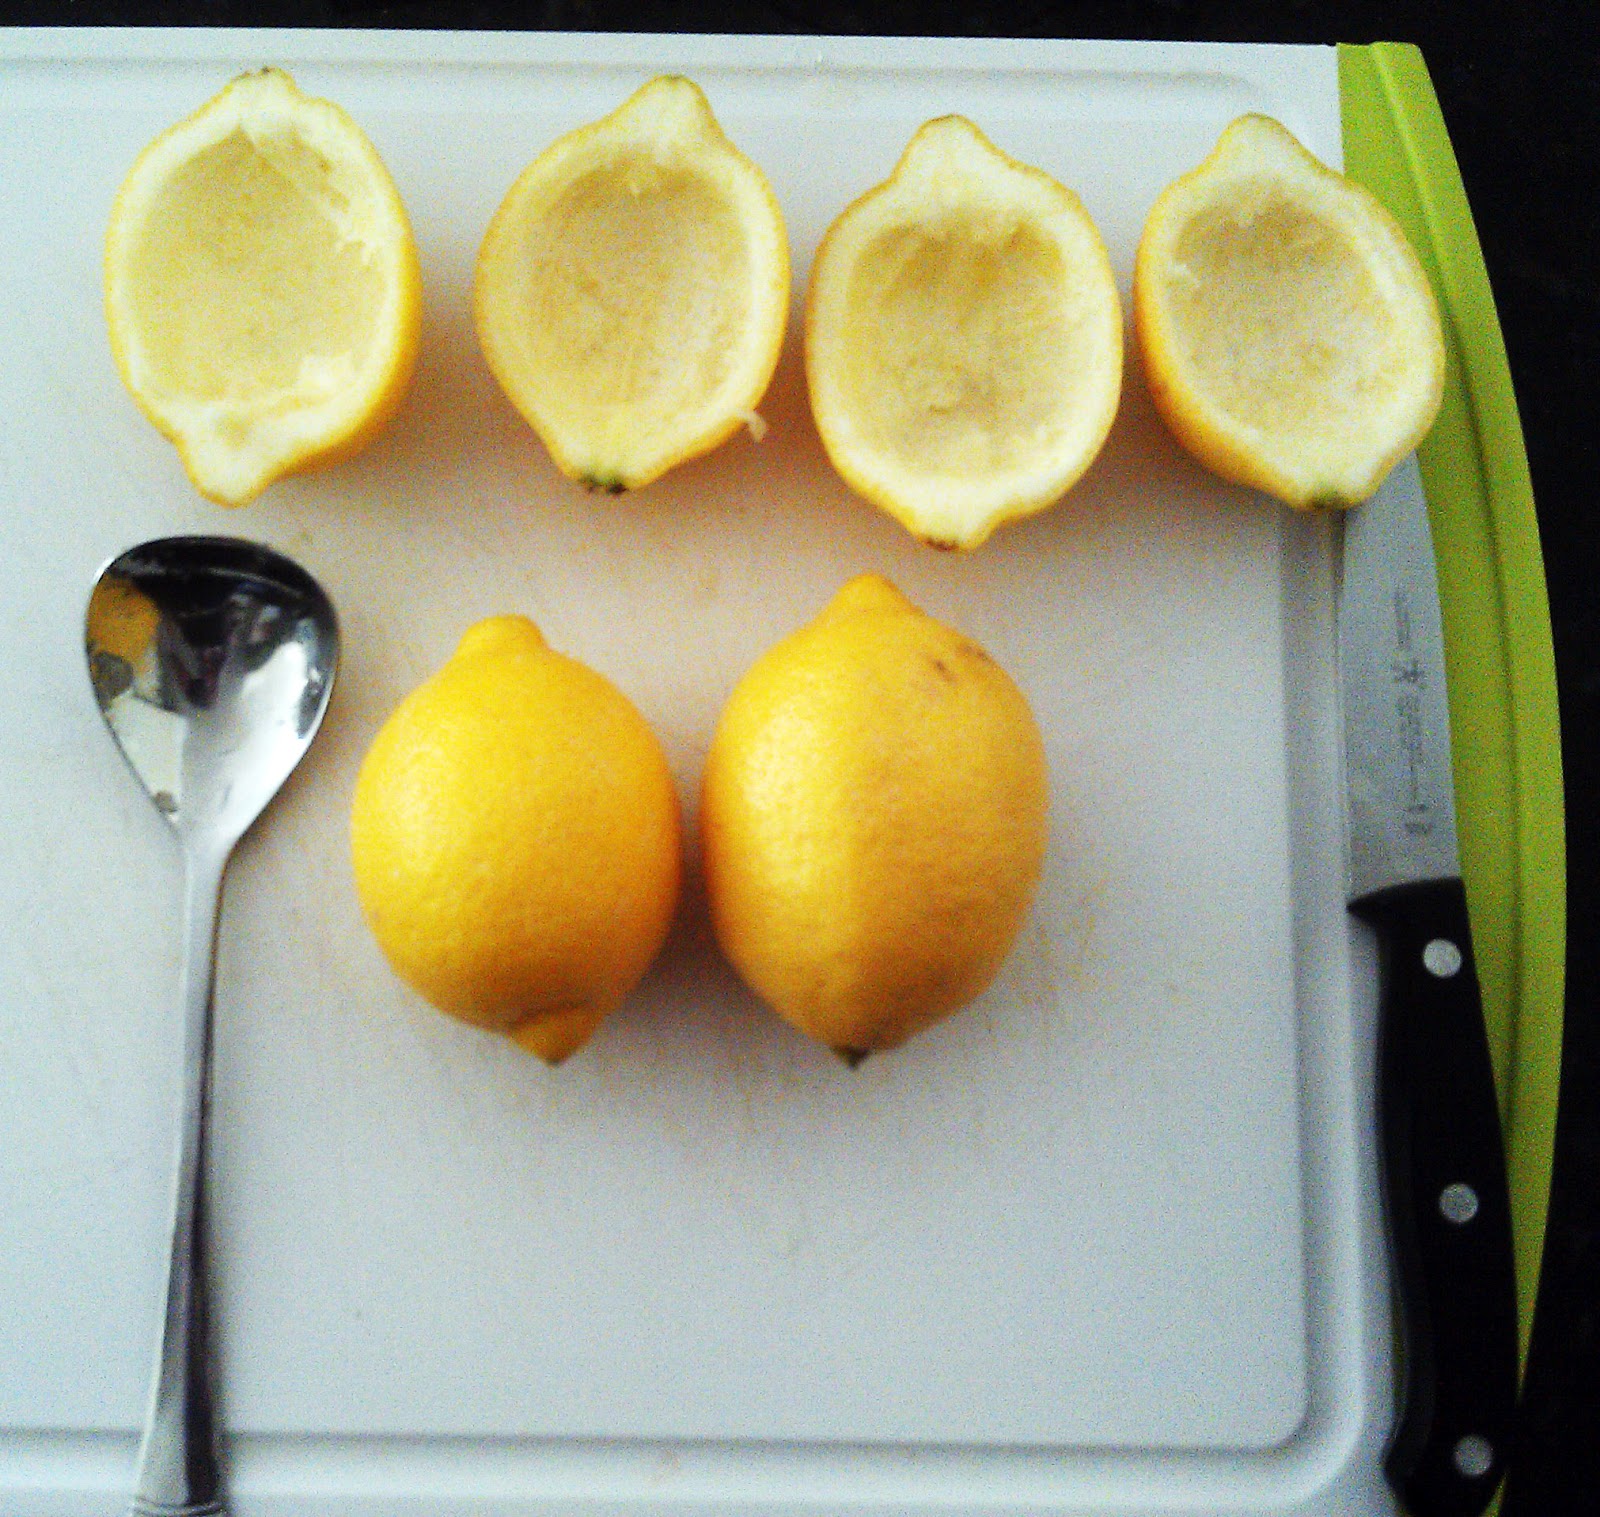
Some wonderful mind out there came up with the idea to use hollowed out lemons and limes to hold the Jello instead. The presentation is not only way more beautiful, but it is so much easier to actually eat the Jello shot. Instead of downing a mangled chunk of Jello, where, let's face it, most of it ends up staying stuck to the cup, it's as simple as eating a fruit slice akin to the days of getting orange slices after a hard-played tee ball game as a child.
Simple ingredient list:
10-12 medium size lemons or limes (will result in 40-48 "shots")
1 small box of flavored Jello
1 cup boiling water
1 cup cold vodka
Directions:
Slice each lemon (or lime) in half. To aid with the removal of the flesh, score around the outside of the fruit careful not to cut the skin. Using a spoon (I used a sugar spoon with more square edges, which was helpful) dig out the flesh of the fruit, again being careful not to tear a hole in the skin. Set aside the flesh that you accumulated to use in other cooking ventures (I love to use lemon in simple, summery pastas with just olive oil, lemon juice, a little garlic powder and some fresh vegis).
After all of the lemons/limes are hollowed, line them up in a large Tupperware container or baking sheet that will fit into the refrigerator. Now it's time to make the Jello. Simply boil a cup of water, then pour it over the packet of gelatin powder (I did this in a medium sized glass measuring cup with a spout to help with ease of pouring). Once the powder is dissolved, add a cup of cold vodka. Stir together then pour into fruit halves, careful not to tip them over. Place in the refrigerator for at least four hours or overnight.
Once the Jello is set, using a sharp knife (it's helpful to spray with a little non-stick cooking spray) cut the fruit halves in half once more so they are bite-sized wedges.
The result: Hand-held, easy to eat slices of Jello shots perfect for any summer (or any season for that matter) party or picnic.
Notes: If you take these to an outdoor party or picnic, make sure to keep them cold in a cooler. Also, depending on what flavor Jello you make, think about getting a flavored vodka to accommodate (I used strawberry lemonade Jello and used citrus vodka). Enjoy, but remember, these tasty treats have a way of sneaking up on you, so have fun and be safe!
Saturday, March 3, 2012
Pinterest love
I have a new lover in my life. We spend long hours together alone from sunset until late into the night. We wake up together early in the morning and sometimes sneak a quicky in during work hours. I haven't told my parents yet, but I think it's almost time to introduce them to the one who I'm spending all my time with: Pinterest. That's right folks, I'm in love with Pinterest. When we were first introduced, I actually ignored Pinterest. I cast it aside like yesterday's garbage, but one day a reminder e-mail piqued my interest and we've been inseparable ever since.
If you haven't hear about Pinterest (it is a fairly new addition to the worldwide web) it is a Web site where people can post (or pin) pictures that connect to Web sites from blogs, to clothing sites, to home furnishings and DIY projects. You then follow friends, companies or even perfect strangers' pins and add them to your own categorized boards. I've pinned recipes, furniture, shoes, jewelery, DIY projects and even entered a contest where I pinned items for a dream bedroom. You can follow my pins at Pinterest.com/LeslieAllyse
And thanks to my love of Pinterest, I was introduced to a fabulous recipe for a Nutella Swirl Coffee Cake from the Sugar Crafter blog. I woke up early this morning and set out to make a freshly baked breakfast and boy, oh boy was that a great decision.
Here's the recipe:
Preheat the oven to 350 degrees and grease a bundt pan. In a large mixing bowl, cream together the butter and sugar. This took about 8 minutes to do after slicing in the cold butter. Add in the vanilla and eggs, beating for about two minutes.
In a smaller bowl, whisk together the flour, baking powder, baking soda, and salt. Add the dry ingredients to the wet ingredients alternately with the yogurt until well-blended. Layer 1/2 of the batter in the pan, and then drizzle 1/2 of the nutella on top. (Put Nutella in the microwave for about 20 seconds to make pouring easier) Swirl with a knife. Repeat until both are gone.
Bake 45 minutes to an hour or until a knife inserted in the cake comes out clean. Let cool before removing from the pan. Store at room temperature in an airtight container or wrapped in aluminum foil.
The coffee cake is great for breakfast, but is just as good served as dessert. This morning I chose to have my slice with a cup of tea and some naval orange from Farmer's Market. Yum!
Now that my Cooking board on Pinterest is loaded with all sorts of new recipes, hopefully I will be back to blogging more often. Fingers crossed.
If you haven't hear about Pinterest (it is a fairly new addition to the worldwide web) it is a Web site where people can post (or pin) pictures that connect to Web sites from blogs, to clothing sites, to home furnishings and DIY projects. You then follow friends, companies or even perfect strangers' pins and add them to your own categorized boards. I've pinned recipes, furniture, shoes, jewelery, DIY projects and even entered a contest where I pinned items for a dream bedroom. You can follow my pins at Pinterest.com/LeslieAllyse
And thanks to my love of Pinterest, I was introduced to a fabulous recipe for a Nutella Swirl Coffee Cake from the Sugar Crafter blog. I woke up early this morning and set out to make a freshly baked breakfast and boy, oh boy was that a great decision.
Here's the recipe:
![]() |
| Ingredients |
- 1 1/2 sticks butter
- 1 1/2 cups sugar
- 1 1/2 tsp vanilla
- 3 eggs
- 3 cups flour
- 1 1/2 tsp baking powder
- 1 1/2 tsp baking soda
- 3/4 tsp salt
- 12 ounces plain Greek yogurt
- 1/2 cup nutella
Preheat the oven to 350 degrees and grease a bundt pan. In a large mixing bowl, cream together the butter and sugar. This took about 8 minutes to do after slicing in the cold butter. Add in the vanilla and eggs, beating for about two minutes.
In a smaller bowl, whisk together the flour, baking powder, baking soda, and salt. Add the dry ingredients to the wet ingredients alternately with the yogurt until well-blended. Layer 1/2 of the batter in the pan, and then drizzle 1/2 of the nutella on top. (Put Nutella in the microwave for about 20 seconds to make pouring easier) Swirl with a knife. Repeat until both are gone.
Bake 45 minutes to an hour or until a knife inserted in the cake comes out clean. Let cool before removing from the pan. Store at room temperature in an airtight container or wrapped in aluminum foil.
The coffee cake is great for breakfast, but is just as good served as dessert. This morning I chose to have my slice with a cup of tea and some naval orange from Farmer's Market. Yum!
Now that my Cooking board on Pinterest is loaded with all sorts of new recipes, hopefully I will be back to blogging more often. Fingers crossed.
Saturday, May 14, 2011
Fresh, light meal
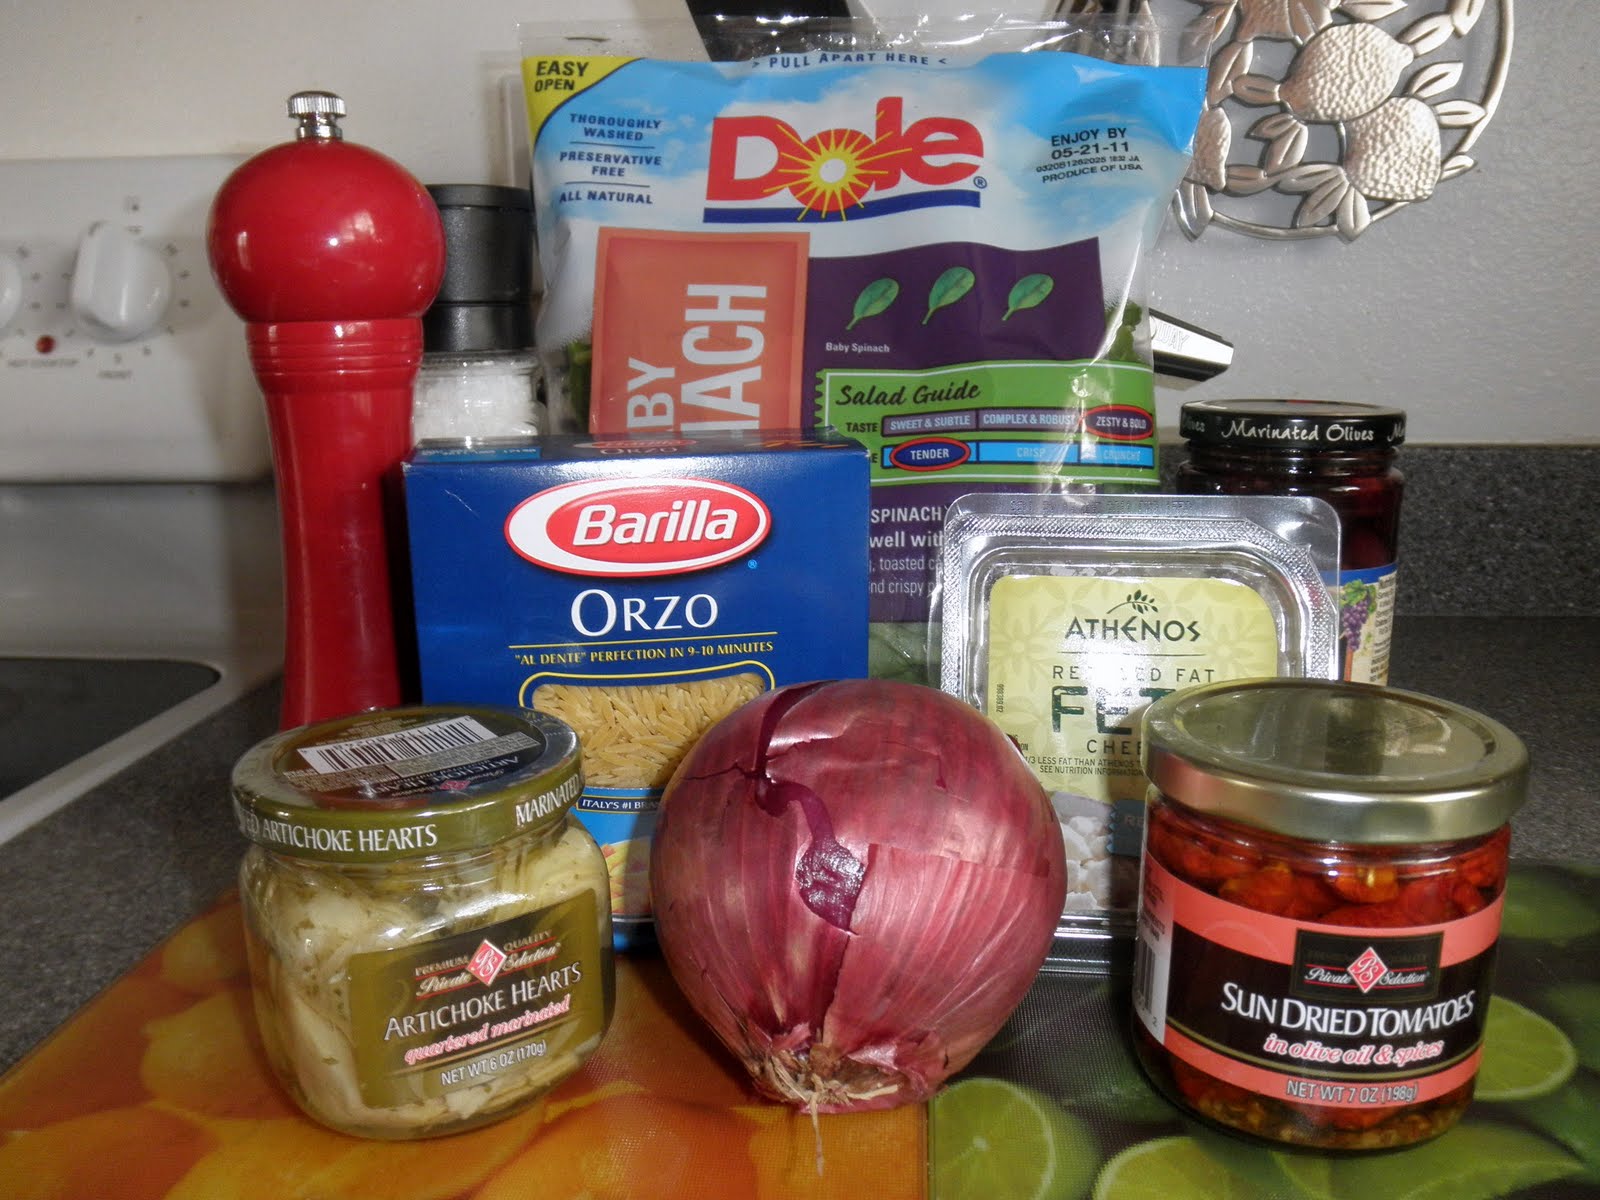
The recipe only asks for a handful of ingredients and it took me about 20 minutes (including 9 minutes to cook the orzo) to make the whole thing.
Here's the recipe. Enjoy.
Mediterranean Orzo Salad with Feta Vinaigrette
Ingredients
1 cup uncooked orzo (rice-shaped pasta; about 8 ounces)
2 cups bagged prewashed baby spinach, chopped
1/2 cup chopped drained oil-packed sun-dried tomato halves
3 tablespoons chopped red onion
3 tablespoons chopped pitted kalamata olives
1/2 teaspoon freshly ground black pepper
1/4 teaspoon salt
1 (6-ounce) jar marinated artichoke hearts, undrained
3/4 cup (3 ounces) feta cheese, crumbled and divided
Cook the orzo according to package directions, omitting salt and fat. Drain; rinse with cold water. Combine orzo, spinach, and next 5 ingredients (through salt) in a large bowl.
Drain artichokes, reserving marinade. Coarsely chop artichokes, and add artichokes, reserved marinade, and 1/2 cup feta cheese to orzo mixture, tossing gently to coat. Sprinkle each serving with remaining feta cheese.
I would also like to mention that this will probably be the last blog I write from this kitchen. I am currently in the process of packing boxes and will be moving at the end of the month. It is sad to pack up after five years, but I'm looking forward to breaking in my new kitchen that comes with gorgeous granite counter tops. Look for another post after I get settled at the beginning of June. Cheers!
Thursday, March 31, 2011
César Chávez bacon day
Working in the newspaper industry, I am rarely offered major holidays off let alone lesser holidays such as President's Day or Cesar Chavez Day. I guess it's a good thing I don't work until 2:30p.m. so that I can enjoy the first part of the day with those who actually get the whole day off from work.
Today, I capitalized on having someone to share my morning with and decided to go out to brunch at a place I don't often go to, Hash House A Go-Go. A while back I saw a show on the Travel Channel called Bacon Paradise where they highlighted places where bacon was a main attraction. The Hash House was one of these places. The restaurant features a few bacon-rich dishes including "O'Hare of the Dog" - a 24oz Budweiser in a brown bag with a side of bacon, "BBBLT" - with obviously more than one slice of bacon, and their "Bacon Waffles" - with 6 pieces of bacon actually baked into a vanilla waffle.
On the show the waffle looked amazing and once I realized I'd be going to brunch, I couldn't get it out of my head. To my sad surprise when I looked over the menu I did not see the waffles listed anywhere. Were we too late? Did they only cook them in the morning and not for the late breakfast menu? Before my hopes could be dashed completely I asked our server if I just missed them on the menu or if they really weren't serving the dish. Much to my jubilation he informed me that indeed I could order the waffles.
Simply stated: heaven. Yet another enjoyable combination of savory and sweet. It was a perfectly crisp on the outside, soft on the inside vanilla waffle and then a delightful burst of smoky, meaty bacon. Well, what are you doing still reading this?! Quick, get thee to the Hash House and order this amazing bit of breakfast heaven.
Today, I capitalized on having someone to share my morning with and decided to go out to brunch at a place I don't often go to, Hash House A Go-Go. A while back I saw a show on the Travel Channel called Bacon Paradise where they highlighted places where bacon was a main attraction. The Hash House was one of these places. The restaurant features a few bacon-rich dishes including "O'Hare of the Dog" - a 24oz Budweiser in a brown bag with a side of bacon, "BBBLT" - with obviously more than one slice of bacon, and their "Bacon Waffles" - with 6 pieces of bacon actually baked into a vanilla waffle.
On the show the waffle looked amazing and once I realized I'd be going to brunch, I couldn't get it out of my head. To my sad surprise when I looked over the menu I did not see the waffles listed anywhere. Were we too late? Did they only cook them in the morning and not for the late breakfast menu? Before my hopes could be dashed completely I asked our server if I just missed them on the menu or if they really weren't serving the dish. Much to my jubilation he informed me that indeed I could order the waffles.
![]() |
| This is serious. 6 slices of bacon baked right into the waffle! |
Monday, March 28, 2011
Not quite bacon, but close enough
I went shopping at Trader Joe's yesterday with a few friends and was contemplating what to make for dinner for my boyfriend, when low and behold I walked by a gorgeous package of pancetta. I immediately thought about making Spaghetti alla Carbonara. I knew that I would need the pancetta, eggs and of course some spaghetti, but I had never made this dish before so had no idea what else I would need.
Just when I was saying how I didn't want a smart phone where I had to pay extra for a data plan, I found myself in the middle of the store needing internet access to recipes. Thank goodness my friend Traci was there. In less than 5-minutes we looked up a recipe on Food Network and I knew exactly what I'd need to buy.
The other reason pasta was on my mind was because I watched the movie "Eat, Pray, Love" in the morning. I have to say that I really didn't enjoy the book when I read it. In fact, I don't even think I finished reading it. The author just went on and on in this "whoa is me" manner that got on my nerves. It's a very rare occasion when a movie is better than the book, but in this case, the movie was WAY better than the book. Partly, I'm sure, because I love Julia Roberts, but also because the whining was kept to a minimum.
But enough about movies and grocery shopping. Here's the main attraction, the recipe.
Just when I was saying how I didn't want a smart phone where I had to pay extra for a data plan, I found myself in the middle of the store needing internet access to recipes. Thank goodness my friend Traci was there. In less than 5-minutes we looked up a recipe on Food Network and I knew exactly what I'd need to buy.
The other reason pasta was on my mind was because I watched the movie "Eat, Pray, Love" in the morning. I have to say that I really didn't enjoy the book when I read it. In fact, I don't even think I finished reading it. The author just went on and on in this "whoa is me" manner that got on my nerves. It's a very rare occasion when a movie is better than the book, but in this case, the movie was WAY better than the book. Partly, I'm sure, because I love Julia Roberts, but also because the whining was kept to a minimum.
But enough about movies and grocery shopping. Here's the main attraction, the recipe.
¼ cup extra-virgin olive oil
1 tablespoon unsalted butter
1 yellow onion, minced
4 ounces pancetta, diced
1 pound fresh linguine
3 large egg yolks, at room temperature
½ cup heavy cream, at room temperature
¾ cup finely grated Parmigiano-Reggiano, at room temperature
Freshly ground black pepper
Heat oil and butter in a large saute pan over medium heat. Add the onion and pancetta and cook until the onions are translucent and the pancetta is beginning to crisp. Remove from the heat and set aside.
Bring a large pot of salted water to a boil and cook the linguine according to package directions until al dente, about 2 to 3 minutes. Drain pasta in a colander (reserve a small amount of the cooking liquid in a small bowl) and return pasta to the pot. Return the pot to the heat and add the reserved pancetta and onion mixture. Stir over high heat until pasta is coated with the pancetta mixture.
In a bowl, whisk together the egg yolks and heavy cream and add to the pasta, along with the Parmesan. Remove the pot from the heat and toss the pasta until it is well-coated. Season with salt and freshly ground black pepper, to taste. If needed, add a bit of the reserved pasta cooking liquid to help toss the pasta if it is dry. Serve immediately.
| The finished product with some garlic & cheese bread. I added a little fresh, chopped parsley to the top of the pasta. |
Mellow yellow
Around Christmas time, I spoiled myself and made a big-girl purchase of a new Kitchen Aid stand mixer. Finally, only four months later, I used it for the first time. When I finally have a place of my own I would love to have a citrus kitchen with lemon, lime and orange colors. In keeping with my kitchen dream, I got the butter cream-yellow mixer and I LOVE it.
In keeping with the yellow theme, I decided to make some banana bread in my new stand mixer. I've made this recipe from Martha Stewart a few times now, and each time I've tweaked it just slightly. I think this time I found my best balance yet. And here's the final result.
Banana-nut Bread from Martha Stewart
3 cups all-purpose flour
1 teaspoon baking soda
¾ teaspoon salt
3 large eggs
1 cups granulated sugar
½ cup light brown sugar
1 1/3 cups vegetable oil
2 tablespoons pure vanilla extract
1 ½ cups ripe mashed banana (about 3 medium)
¾ cup unsweetened shredded coconut
¾ cup pecans, toasted and finely chopped
½ cup buttermilk
Nonstick cooking spray
Preheat the oven to 350⁰F. Coat two 9-by-5-inch loaf pans with cooking spray, spray; set aside. In a large bowl, whisk together the flour, baking soda, and salt; set aside.
In the bowl of an electric mixer fitted with the paddle attachment, beat the eggs, both kinds of sugar and vegetable oil on medium-low speed until combined. Beat in the flour mixture. Add the vanilla, banana, coconut, nuts and buttermilk, and beat just to combine.
Divide batter evenly between prepared pans, gently rock pans side-to-side until top is smooth. Bake, rotating pans halfway through, 60-65 minutes; when inserted, a toothpick should come out clean. Transfer to a wire rack to cool for 10 minutes. Remove loaves from pans and let cool completely. Bread can be kept at room temperature, wrapped well in plastic, for up to 1 week, or frozen for up to 3 months.
And, while it wasn't watched while sitting on the couch, I do have to pass along that I went and saw the movie "Happy, Thank You, More Please" with some friends on Sunday. I thought it was a pretty cute movie. It was a screen play written by the leading actor Josh Radnor and it reminded me a lot of "Garden State." It's only playing at select theaters, but I'd probably say I'd wait for it on DVD.
Tuesday, March 8, 2011
Sunny strawberries
Yesterday was one of those unusual days in San Diego. It was raining. It was windy. It was cold outside. But inside my cozy apartment was another story. Inside, I was basking in the glow of some gorgeous, sunny strawberries that I had found at the store that morning. And boy were they ever delicious -- so delicious in fact, that I had to share a picture.
Friday, February 11, 2011
Wake up, it's beer time
There aren't many things that will get me out of bed early -- the smell of bacon cooking in the kitchen, a fire alarm going off and of course, the offering of beer. Thursday morning it was the call of beer that had me wiping sleep out of my eyes at the crack of 9 a.m.
Once a year the northern California brewery Russian River releases a limited amount of the 11%ABV brew Pliny the Younger. After finding out from Brewery Rowe that the San Diego bar O'Brien's would have a keg on the weekend, a friend did some searching and found out we could enjoy the tasty beverage at an earlier time. Thanks to Toronado San Diego we were able to enjoy it three days earlier. A lot of other bars around San Diego are being very hush-hush on when they will tap their prized keg.
When we arrived at Toronado at 9:20 a.m. there were already 10 people in line in front of him. My job was to stop for donuts on the way to the bar and by the time I got there around 9:40 there were about 20 people in line. There were moms with kids, men in business suits, hipsters and me in my workout clothes (eating a donut and getting ready to drink beer, that's how I roll).
While waiting in line people started showing up with cameras taking pictures of the odd spectacle of people waiting in line for a bar before 10 a.m. on a workday. And finally, with about 30 people in line, the doors to Toronado opened just past 10 a.m.
Like the orderly beer drinkers we are, everyone filed in to the end of the bar and in order, took a seat at the bar. After the bar chairs ran out, beer fans filed in behind in a calm, orderly fashion. And the Pliny started flowing.
So, was it worth getting up early and waiting in line to try? When craft brews reach the threshold of 10%ABV, they have the tendency to get a bit syrupy, but Pliny the Younger was extremely smooth and full of flavor. I give the Younger two very enthusiastic thumbs up. I wish I could have had more than one, but after my inaugural drink I could feel the fact that it was an 11% beer. I knew that if I would have had more than one I would have been struggling to hold poses at yoga afterward. I am glad, however, that this beer only comes out once a year, because if it were available at all times, that could lead to some trouble -- and the addition of a beer belly.
By the time I left the bar around 11:30 to head to yoga class, there were probably close to 75-100 people. I read later that the first keg was dust by noon and while Toronado was lucky enough to have a second keg, it was tapped out around 3 p.m. Well done fellow beer drinkers.
Once a year the northern California brewery Russian River releases a limited amount of the 11%ABV brew Pliny the Younger. After finding out from Brewery Rowe that the San Diego bar O'Brien's would have a keg on the weekend, a friend did some searching and found out we could enjoy the tasty beverage at an earlier time. Thanks to Toronado San Diego we were able to enjoy it three days earlier. A lot of other bars around San Diego are being very hush-hush on when they will tap their prized keg.
When we arrived at Toronado at 9:20 a.m. there were already 10 people in line in front of him. My job was to stop for donuts on the way to the bar and by the time I got there around 9:40 there were about 20 people in line. There were moms with kids, men in business suits, hipsters and me in my workout clothes (eating a donut and getting ready to drink beer, that's how I roll).
While waiting in line people started showing up with cameras taking pictures of the odd spectacle of people waiting in line for a bar before 10 a.m. on a workday. And finally, with about 30 people in line, the doors to Toronado opened just past 10 a.m.
Like the orderly beer drinkers we are, everyone filed in to the end of the bar and in order, took a seat at the bar. After the bar chairs ran out, beer fans filed in behind in a calm, orderly fashion. And the Pliny started flowing.
So, was it worth getting up early and waiting in line to try? When craft brews reach the threshold of 10%ABV, they have the tendency to get a bit syrupy, but Pliny the Younger was extremely smooth and full of flavor. I give the Younger two very enthusiastic thumbs up. I wish I could have had more than one, but after my inaugural drink I could feel the fact that it was an 11% beer. I knew that if I would have had more than one I would have been struggling to hold poses at yoga afterward. I am glad, however, that this beer only comes out once a year, because if it were available at all times, that could lead to some trouble -- and the addition of a beer belly.
| Fallen soldiers. |
Subscribe to:
Posts (Atom)